

Don’t throw away those old wine corks! With a little creativity, you can transform them into a beautiful wall-mounted key holder that keeps your keys organized while adding a charming handmade touch to your home.
If you enjoy simple DIY projects, recycled crafts, and rustic home decor, this creative wine cork key holder is worth trying.
Imagine a row of natural corks decorated with miniature roses, delicate lavender, and vintage-style metal hooks. Suspended from a decorative chain, the finished piece looks like a tiny hanging flower garden with a practical purpose.
And the best part? You don’t need advanced woodworking skills or expensive materials.
With a few recycled wine corks, a sturdy backing board, small hooks, artificial flowers, and basic crafting supplies, you can create your own decorative key organizer.
In this step-by-step tutorial, you’ll discover how to make a DIY wine cork key holder, choose the right materials, secure the hooks properly, and customize the design to match your home’s style.
🌹 Why Make a Key Holder From Wine Corks?
Wine corks are surprisingly versatile crafting materials. Their natural texture and warm colors make them particularly suitable for rustic and vintage-inspired decorations.
Here are five reasons to try this project:
- Give Old Wine Corks a Second Life: Instead of discarding natural cork stoppers, you can reuse them in a decorative household project. This is a creative way to repurpose materials you already have.
- Keep Your Keys Organized: A wall-mounted key holder gives your keys a designated place. Hang it near your entrance, hallway, or kitchen so you can easily find your keys when leaving home.
- Create Unique Wall Decor: Unlike ordinary plastic key racks, a handmade cork organizer adds texture and personality to your walls. Artificial flowers, greenery, and decorative chains can make the piece resemble a miniature hanging garden.
- Enjoy an Affordable DIY Project: If you already have wine corks and basic craft supplies, you may only need to purchase a few small hooks and mounting accessories.
- Make a Thoughtful Handmade Gift: A personalized wine cork key holder can make a lovely gift for someone who enjoys rustic decorations, handmade accessories, or creative upcycling projects.
🛠️ Materials Needed for a DIY Wine Cork Key Holder

Before starting, gather your supplies and prepare a clean work surface.
Essential Materials
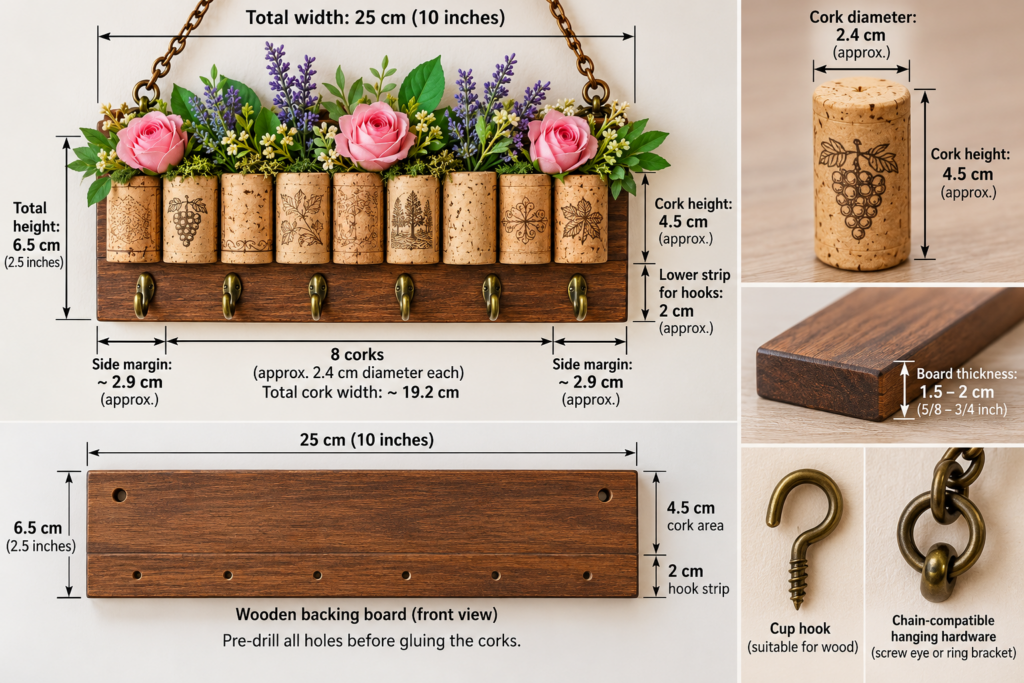
- 8 natural wine corks (Standard arrangement for a 25 cm board; use a longer board if adding more corks)
- A small wooden backing board, approximately 25 × 6.5 cm (10 × 2.5 inches)
- Wooden board thickness: approximately 15–20 mm (⅝–¾ inch)
- 5–8 small metal cup hooks suitable for installation in wood
- Chain-compatible hanging hardware: Two metal attachments specifically designed for chain suspension, installed according to the manufacturer’s instructions
- A decorative metal chain
- Artificial roses or miniature flowers
- Artificial lavender or greenery
- Decorative moss (optional)
- A narrow wooden strip or lightweight floral support for attaching the flowers
- Adhesive specifically recommended for bonding cork to wood
- Small wood screws (if needed)
- Wall hook and suitable mounting hardware
Tools
- Measuring tape or ruler
- Pencil
- Craft knife
- Small drill and suitable drill bits
- Screwdriver
- Wire cutters or pliers
- Hot glue gun (optional)
- Sandpaper
- Protective work surface
Beginner tip: Natural corks often vary in diameter. Try to select corks of similar sizes to create a neat, balanced design.
⚠️ Important Safety Note: For a functional key holder, do not rely on glue or cork alone to support the weight of your keys. The wooden backing board should provide the main structural support. Corks are best used as decorative elements, while the hooks and hanging chain should be securely attached to the wood.
🔨 How to Make a Wine Cork Key Holder: Step-by-Step
This project combines a hidden wooden backing board, a decorative row of corks, small key hooks, and a floral arrangement. Preparing the backing board and drilling pilot holes before attaching the corks prevents damage during assembly.
Step 1: Clean and Prepare the Wine Corks
Start by collecting 8 natural corks for the standard design. Remove any visible dirt or residue using a slightly damp cloth. If necessary, wash them briefly with mild soap and water, and allow them to dry completely before using glue.
Avoid soaking corks for long periods because moisture can affect their shape and drying time.
How to Choose the Best Corks:
Look for corks that are firm and intact, free from visible mold, similar in length, not excessively cracked, and large enough for the intended decorative arrangement.
DIY tip: Corks with printed vineyard names can give the finished organizer a distinctive vintage appearance.
Step 2: Prepare the Wooden Backing Board & Drill Pilot Holes First
Preparing all mounting holes before gluing the corks is the most practical approach. This prevents accidental pressure on the corks or fresh glue during drilling.
Recommended Board Dimensions & Layout:
- Board Dimensions: 25 cm long × 6.5 cm high × 1.5–2 cm thick.
- Cork Width Calculation: 8 standard corks (approx. 2.4 cm diameter each) occupy around 19.2 cm. On a 25 cm board, this leaves a neat ~3 cm side margin on each end for a balanced look.
- Exposed Lower Strip: Standard corks measure about 4.5 cm in length. Placing them at the top of a 6.5 cm high board leaves a visible 2 cm wooden mounting strip along the bottom edge.
Preparation & Pre-Drilling:
- Cut or select your board and smooth rough edges with sandpaper.
- Paint, stain, or leave the wood natural. (A dark brown finish complements natural corks well.)
- Mark & Choose Hook Hardware: Select small cup hooks whose bases fit comfortably within the 2 cm lower strip. Choose small screw hooks with threaded shanks shorter than the board’s thickness. Ensure the screws have sufficient engagement in solid wood without protruding through the back, following the hardware manufacturer’s recommendations. Mark 5 to 8 locations evenly spaced along the front face of the lower strip.
- Mark Chain Mounting Points: Position two metal attachments designed specifically for chain suspension into solid wood according to the manufacturer’s recommendations.
- Drill Pilot Holes: Drill small pilot holes at all marked locations using a drill bit appropriately sized for the selected hardware threads.
Step 3: Test Hardware Fit
Screw the cup hooks into the front face holes and the chain mounts into their pilot holes to verify that:
- The screw shanks engage the wood securely without cracking it or protruding through the back.
- The hook bases fit neatly within the lower 2 cm strip.
- The metal chain attachments are firmly anchored and aligned to support the load direction.
Once verified, temporarily unscrew the hardware to leave a flat surface for attaching the corks.
Step 4: Attach the Corks to the Board
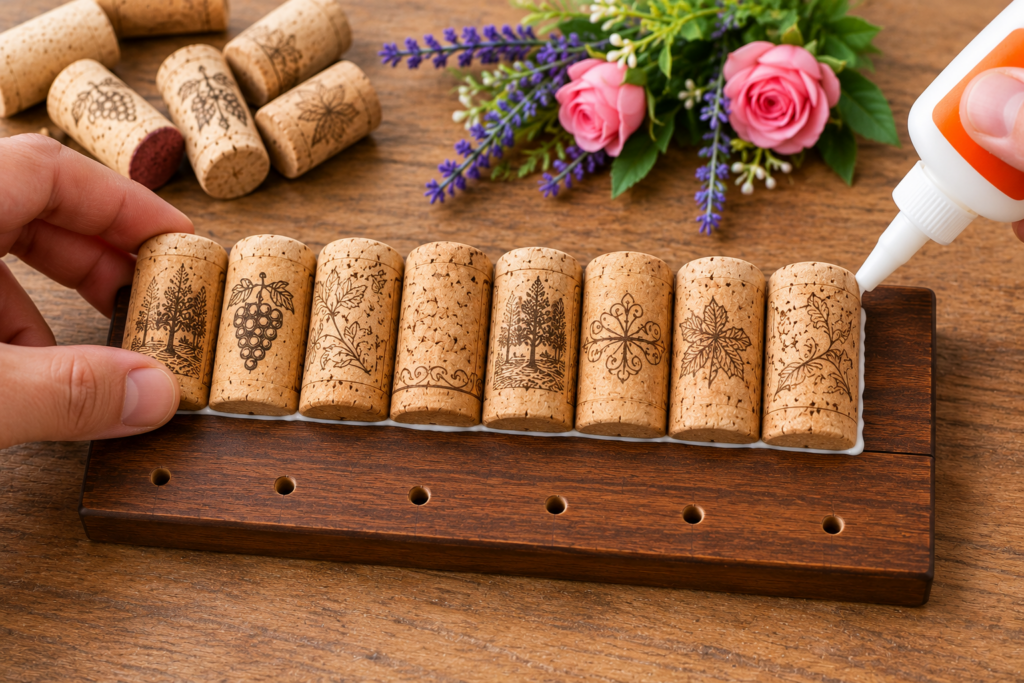
- Place 8 corks upright side-by-side on the upper portion of the backing board with their printed sides facing forward.
- Confirm that the bottom ends of the corks align right above the lower 2 cm mounting strip, leaving the pre-drilled hook holes on the front face clearly visible.
- Choose the Right Glue: Apply an adhesive specifically recommended for bonding cork to wood (such as a multi-surface contact adhesive or heavy-duty mounting glue). If using synthetic stoppers, verify compatibility and test the adhesive on a spare piece before assembly.
- Press the corks firmly onto the board and allow the adhesive to cure completely according to the manufacturer’s instructions.
Step 5: Install Key Hooks and Chain

Now that the corks are set and the holes are pre-drilled, installing the hardware is quick and safe:
- Screw the metal cup hooks back into the pre-drilled holes on the front face of the lower wooden strip until firmly seated.
- Reinstall the metal chain attachments into their designated solid wood points following the manufacturer’s instructions.
- Attach the metal chain to the mounts using pliers to close any open links.
- Verify Load Capacity: Hang the organizer temporarily by the chain and test its stability with a light key set before daily use.
🌸 How to Decorate Your Cork Key Holder With Artificial Flowers
Now comes the creative part! The floral decoration transforms a simple key organizer into an attractive piece of handmade wall art.
Step 6: Create the Floral Arrangement

Start with three small artificial roses. Position one in the center and the others toward the left and right. Next, add a few slender lavender stems behind the roses to create height and visual contrast. Fill any visible gaps with small artificial leaves or decorative moss.
A Simple Arrangement Formula:
- 3 miniature roses
- 4 to 6 lavender stems
- A few small green leaves
- A little decorative moss
Keep the arrangement lightweight. Avoid large, heavy artificial flower heads that could pull the decoration away from the backing board.
How to Keep the Flowers Securely in Place:
Attach a narrow wooden strip or lightweight floral support behind the corks. This small support provides a surface for securing the flower stems. Arrange the flowers on the support before permanently attaching them, then conceal the stems with artificial leaves or decorative moss.
Important: Position the floral support so it does not interfere with the hanging-chain attachments or weaken the backing board.
Step 7: Secure Flowers & Hang the Finished Holder
- Use craft adhesive or hot glue to secure lightweight floral stems to the additional floral support or top of the wooden backing.
- Ensure the flowers do not cover the key hooks or obstruct access to keys.
- Once all adhesives have fully cured, mount the finished key holder using a wall anchor or hook appropriate for your wall type (drywall, masonry, or wood).

🎨 7 Creative Ways to Customize Your Wine Cork Key Holder
- Rustic Farmhouse Cork Key Holder: Use natural corks, distressed wood, black metal hooks, small white flowers, and muted greenery.
- Romantic Rose Garden Design: Decorate with miniature red or pink roses, lavender, soft green foliage, and antique brass accents.
- Minimalist Modern Design: Skip the flowers entirely. Use evenly aligned corks, a simple wooden backing, and clean black hooks.
- Coastal-Inspired Key Holder: Choose light-colored corks, whitewashed wood, and subtle nautical or light blue accents.
- Personalized Family Key Rack: Add small name labels above each hook so every family member has a designated place for their keys.
- Holiday-Themed Cork Organizer: Swap seasonal decorations (Spring: pastel flowers and greenery; Autumn: miniature leaves and warm accents; Winter: artificial evergreen sprigs and small ornaments).
- Wine-Themed Kitchen Decor: Keep printed winery names fully visible, paired with dark wood and bronze-colored hooks.
📏 What Size Should a Wine Cork Key Holder Be?
| Design | Number of Corks | Board Dimensions | Side Margins | Suggested Use |
| Mini organizer | 4–5 | 16 × 6.5 cm | ~2.0 cm | A few lightweight keyrings |
| Standard organizer | 8 | 25 × 6.5 cm | ~2.9 cm | Everyday household keys |
| Extended organizer | 10–12 | 32 × 6.5 cm | ~1.6–4.0 cm (depending on cork count) | Larger households, with suitable support |
🧰 Common Mistakes to Avoid
- Screws Protruding Through the Back: Forcing overly long screws into thin boards damages the back face. (Better approach: Choose screw shanks shorter than the board thickness, ensuring solid engagement.)
- Screwing Hooks Into the Bottom Edge: Screwing hooks into the narrow bottom edge risks splitting the board. (Better approach: Always screw hooks into the front face of the lower wooden strip.)
- Unsuitable Chain Mounts: Using standard picture hangers for chain links risks failure. (Better approach: Use metal attachments specifically designed and rated for chain suspension.)
- Forgetting Side Margins for Extra Corks: Forcing 12 corks onto a 25 cm board leaves no side spacing. (Better approach: Use 8 corks for a 25 cm board, or expand the board length to 32 cm for 10–12 corks.)
- Using the Wrong Adhesive: Standard wood PVA glue fails on synthetic stoppers or non-porous surfaces. (Better approach: Use a multi-surface contact adhesive and test on spare pieces.)
❓ Frequently Asked Questions
- How do I prevent hook screws from poking through the back of the board?Select screw hooks with threaded shanks shorter than the board’s thickness. Ensure sufficient wood engagement without protruding through the back, following manufacturer instructions.
- Where exactly should I install the key hooks?Install them directly into the front face of the lower 2 cm exposed wooden strip using small cup hooks whose base fits neatly within that space.
- How should I secure the chain to the board?Use two metal attachments designed specifically for chain suspension, installed into solid wood following manufacturer guidelines, and test with light key sets before regular use.
🌹 Final Thoughts
With 8 corks on a 25 × 6.5 cm board, properly dimensioned front-face hooks, dedicated chain hardware, and lightweight floral accents, your DIY wine cork key holder is a charming, functional addition to your entryway designed for everyday household keys!