

Before tossing your empty egg cartons into the recycling bin this holiday season, take a second look—they might just become the centerpiece of your festive decor. What most people throw away without a second thought can easily be transformed into realistic, sculpted winter blossoms with a little paint and creativity.
If you love egg carton Christmas crafts and want to create charming recycled Christmas decorations without spending a fortune, this DIY Christmas wreath is the perfect weekend project. In just a few simple steps, ordinary cardboard turns into a warm, rustic decoration you’ll be proud to display indoors all winter long.
⏱️ Project Overview & Time Breakdown
- Active Prep & Crafting Time: 40–50 minutes
- Paint Drying Time: Approximately 30–45 minutes (or longer depending on paint thickness and two-coat coverage—make sure the flowers are completely dry before gluing)
- Total Time: Approximately 1 hour 15 minutes to 1 hour 45 minutes
- Skill Level: Beginner-friendly (adult supervision required for hot glue)
✂️ Materials & Tools You Will Need
Before starting your project, gather your supplies on a protected work surface:
- Cardboard egg cartons: 2–3 clean, dry pulp egg cartons, providing approximately 16–24 flower cups depending on the size and layering of your design
- Cardboard wreath ring: A flat ring cut from a sturdy shipping box (around 10 to 12 inches in outer diameter)
- Acrylic paints: Festive shades of crimson red, forest green, and crisp white, plus a touch of yellow or gold for flower centers
- Paintbrushes: A medium flat brush for painting the cups and a fine detail brush for the centers
- Scissors: Sharp craft scissors for cutting and shaping the carton cups
- Hot glue gun and glue sticks: For fast, secure assembly
- Faux evergreen sprigs: Small pine or fir branches to fill in the base
- Festive embellishments: Mini pinecones, faux red berries, and natural jute twine for a rustic bow
🛠️ Step-by-Step Instructions: DIY Christmas Wreath
1. Cut and Shape the Egg Carton Flowers (10–15 minutes)

- Carefully cut out 16 to 24 individual cups from the bottom trays of your cardboard egg cartons, adjusting the exact count based on your wreath diameter and whether you plan to double-layer any blossoms.
- Trim the top edge of each cup into four or five rounded petal shapes so each cup resembles a blooming poinsettia or winter rose.
- Vary the sizes slightly—making some cups slightly shallower and smaller—to add natural dimension and visual interest to your wreath.
2. Paint the Flowers in Festive Holiday Colors (10–15 minutes + 30–45 minutes drying)

- Coat the inside and outside of your shaped carton cups using red, green, and white acrylic paint.
- Apply two thin coats if needed so the natural gray or brown cardboard doesn’t show through.
- Set the painted cups aside on newspaper or parchment paper for roughly 30 to 45 minutes (or longer depending on the paint brand and number of coats). Ensure every flower cup is completely dry to the touch before moving on to the gluing step.
- (Tip: Once dry, you can add tiny yellow or gold dots in the middle of the flowers—or glue small beads or berry accents into the center later—for a realistic floral look).
3. Glue the Flowers Onto the Cardboard Wreath Base (10 minutes)
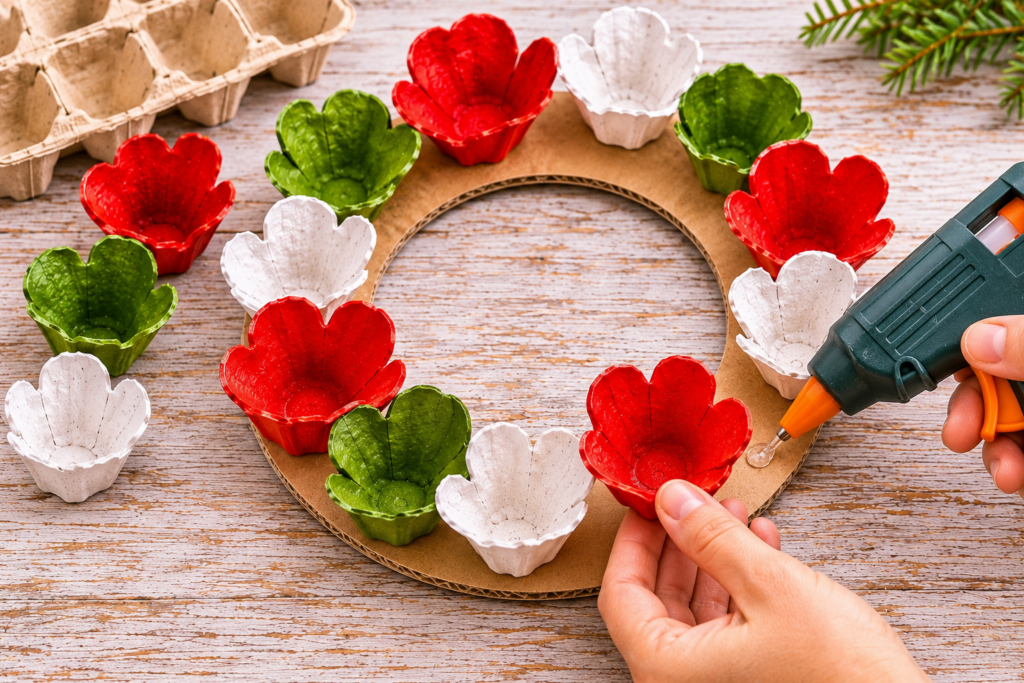
- Cut a ring out of heavy-duty corrugated cardboard, making sure the border is about 1.5 to 2 inches wide so it stays rigid.
- Arrange your completely dry egg carton flowers around the cardboard ring before gluing to balance the red, white, and green colors evenly.
- Using a hot glue gun, attach the flowers securely onto the cardboard ring, slightly overlapping or clustering them together.
4. Fill in With Evergreen Sprigs, Pinecones, and Berries (10 minutes)

- Tuck small faux pine or fir sprigs between and behind the painted egg carton flowers, securing each stem to the cardboard base with hot glue.
- Glue clusters of faux red berries and miniature pinecones into the gaps around the flowers to hide any visible cardboard and create a lush, full wreath.
- Add small golden or pearl-like accents to the centers of the white and green flowers to make them pop.
5. Finish With a Rustic Jute Twine Bow (5 minutes)

- Wrap several loops of natural jute twine around your fingers, pinch the middle, and tie it tightly with another piece of twine to form a multi-loop rustic bow.
- Glue the twine bow onto the bottom corner of the wreath.
- Attach a loop of jute twine or ribbon to the back of the cardboard ring so your finished DIY Christmas wreath is ready to hang.

⚠️ Safety, Display & Storage Tips
- Use only clean, dry cartons: Inspect your egg cartons carefully and choose only clean, dry pulp cartons. Avoid any cartons that are visibly stained, damp, or soiled. Do not use foam or plastic cartons, as they melt under hot glue and do not hold acrylic paint well.
- Keep hot glue strictly for adults: While children can safely help cut and paint the cardboard cups, the hot glue gun reaches high temperatures that can cause burns—reserve all hot glue assembly strictly for adults.
- Keep away from flames and heat sources: Because cardboard, paper pulp, and faux greenery are flammable, place your wreath well away from open flames, lit candles, space heaters, and hot lightbulbs. Avoid hanging it directly above an active, working fireplace.
- Display primarily indoors: Because both the base and flowers are made from paper pulp and cardboard, this wreath is designed primarily as an indoor decoration (such as on an interior door or hallway wall). Even with a craft sealer, varnish does not make cardboard waterproof—direct rain, snow, or heavy outdoor humidity will eventually soften and warp the paper fibers.
- Store properly for next year: When the holidays are over, gently dust off the wreath and store it flat inside a sturdy, rigid cardboard box or plastic bin in a dry location. Keeping it protected from crushing and moisture ensures you can reuse your DIY Christmas wreath for many holiday seasons to come.
❓ Frequently Asked Questions (FAQ)
Can I hang an egg carton Christmas wreath outdoors?
This wreath is intended primarily for indoor display. Even with a protective spray varnish, cardboard and paper pulp are not waterproof and will soften or lose their shape if exposed to rain, snow, or damp outdoor air. If placed near an entrance, hang it on the inside of your front door.
How long does it take to make this DIY Christmas wreath?
Active crafting takes about 40 to 50 minutes. Including paint drying time (typically 30 to 45 minutes, or longer if applying two coats), expect the full project to take around 1 hour 15 minutes to 1 hour 45 minutes. Make sure the painted cups are completely dry before assembling with glue.
How many egg carton flowers do I need for a wreath?
For a standard 10- to 12-inch wreath ring, you will need roughly 16 to 24 cardboard flowers (from 2 to 3 egg cartons), depending on how closely you cluster them and whether you layer smaller cups inside larger ones for extra fullness.
What kind of glue works best for egg carton Christmas crafts?
A hot glue gun is ideal for adult crafters because it bonds cardboard, faux greenery, and pinecones almost instantly. If crafting with younger children, thick white tacky craft glue can be used instead, though you will need to allow extra drying time and hold pieces in place while they set.
🏁 Final Thoughts
Creating recycled Christmas decorations proves that festive holiday charm comes from imagination rather than an expensive store-bought price tag. By rescuing a few empty egg cartons from the recycling bin, you can craft a one-of-a-kind DIY Christmas wreath that brings handmade warmth to your home all season long.
Would you stick with classic red, white, and green, or try another holiday color palette for your wreath? Share your ideas in the comments below! 💬🎄