

Want crispy, golden tilapia without deep-frying or covering your kitchen in oil? Your air fryer can help you make a delicious fish dinner with a lightly crunchy exterior and tender, flaky center—in less than 20 minutes of cooking.
But there’s one problem many home cooks encounter: their tilapia comes out dry, pale, or disappointingly soft instead of beautifully golden.
The good news? You don’t need a complicated recipe or expensive ingredients to improve the results.
The secret lies in removing excess moisture, using a thin coating, and avoiding overcrowding the air fryer basket.
Whether you’re preparing a quick weeknight dinner, looking for easy seafood recipes, or trying to use your air fryer more often, this crispy air fryer tilapia recipe is worth saving.
⏱️ Quick Recipe Overview
| Recipe Details | Information |
|---|---|
| Preparation time | 10 minutes |
| Cooking time | 8–12 minutes |
| Total time | Approximately 20–25 minutes |
| Servings | 4 |
| Cooking temperature | 400°F (200°C) |
| Difficulty | Easy |
| Best fish | Thawed, boneless tilapia fillets |
| Internal temperature | 145°F (63°C) |
Why you’ll love this recipe: It’s quick, customizable, uses relatively little oil, and pairs beautifully with vegetables, rice, potatoes, or a fresh salad.
🐟 Why Does Air Fryer Tilapia Sometimes Turn Out Soggy?
Tilapia is a mild, lean white fish. Its delicate texture makes it ideal for fast cooking, but it can also dry out when overcooked.
One of the biggest challenges is moisture.
If you place wet fish directly into an air fryer basket, surface moisture must evaporate before the exterior can brown effectively.
This can leave your fish looking pale rather than golden.
Other common reasons include:
- Cooking straight from a partially thawed state without adjusting the method.
- Adding too much wet marinade.
- Overcrowding the basket.
- Using too much oil.
- Cooking the fish for too long.
- Expecting a thick, crunchy crust without using any coating.
The solution isn’t necessarily more oil or a longer cooking time.
It’s preparing the surface of the fish correctly before cooking.
🧂 Ingredients for Crispy Air Fryer Tilapia
This recipe uses everyday ingredients to create a lightly seasoned, golden crust.
Main ingredients
- 4 tilapia fillets, approximately 4–6 ounces each, fully thawed
- 2 tablespoons plain panko breadcrumbs
- 2 tablespoons finely grated Parmesan cheese
- 1 tablespoon cornstarch
- 1 teaspoon paprika
- ½ teaspoon garlic powder
- ½ teaspoon onion powder
- ½ teaspoon dried oregano or Italian seasoning
- ¼ teaspoon black pepper
- ¼–½ teaspoon salt, adjusted to taste
- 1–2 teaspoons olive oil or a light coating of cooking spray
- Lemon wedges, for serving
- Fresh parsley, optional
Optional: Add a pinch of cayenne pepper if you enjoy a little heat.
Why use cornstarch?
Cornstarch can help absorb a small amount of surface moisture and create a delicate crisp coating.
However, it works best when combined with proper drying, a little oil, and sufficient hot-air circulation.
Why add panko?
Panko breadcrumbs provide a light, crunchy texture that ordinary seasoning alone cannot achieve.
The Parmesan adds savory flavor and can encourage browning.
If you prefer a gluten-free recipe, use certified gluten-free breadcrumbs and check the other packaged ingredients.
🍳 How to Make Crispy Air Fryer Tilapia: Step by Step
Step 1: Pat the Tilapia Completely Dry

This is one of the most important steps.
Remove the thawed tilapia fillets from their packaging and place them on a plate lined with paper towels.
Gently pat both sides dry.
You don’t need to rinse the fish. Rinsing raw fish can spread bacteria around the sink and kitchen surfaces.
Why it matters: Removing surface moisture helps the seasoning and coating adhere while reducing excess steam during cooking.
If your fillets were previously frozen, make sure they are completely thawed and well drained.
Step 2: Prepare the Crispy Seasoning Mixture

In a shallow bowl, combine:
- Panko breadcrumbs
- Parmesan cheese
- Cornstarch
- Paprika
- Garlic powder
- Onion powder
- Dried oregano
- Black pepper
- Salt
Mix until evenly combined.
The mixture should look dry and slightly granular.
For extra flavor, you can add a little lemon zest.
Avoid adding lemon juice directly to the dry coating, because too much liquid can make the breadcrumbs clump together.
Step 3: Lightly Oil and Coat the Fish

Brush both sides of each fillet with a very thin layer of olive oil.
Press the fish gently into the breadcrumb mixture, coating both sides.
Shake off any loose excess.
You want a light, even layer—not a thick coating that falls off during cooking.
Helpful tip: If the coating isn’t sticking well, gently press it onto the fish with your fingers.
Step 4: Preheat the Air Fryer
If your air fryer manufacturer recommends preheating, set it to 400°F (200°C) for approximately 3 minutes.
Preheating helps the cooking environment reach the intended temperature before the fish goes in.
Some air fryers do not require preheating, so follow your model’s instructions.
Lightly grease the basket if needed.
Step 5: Arrange the Tilapia in a Single Layer

Place the coated fillets inside the air fryer basket.
Leave a little space between each piece so hot air can circulate.
Avoid stacking the fillets.
If your basket is small, cook the fish in batches.
Important: An overcrowded basket can produce uneven cooking and a softer coating.
Step 6: Air Fry Until Golden and Flaky

Cook at 400°F (200°C) for approximately 8–12 minutes, depending on the thickness of the fillets and your air fryer model.
Check the fish after about 6–7 minutes.
If the coating needs more even browning, carefully turn the fillets using a thin spatula.
Some models cook evenly without flipping.
The fish is ready when:
- The coating looks lightly golden.
- The flesh separates easily into flakes.
- The thickest part reaches 145°F (63°C) on a food thermometer.
Don’t rely on color alone. A golden coating does not guarantee the fish is fully cooked.
Step 7: Serve Immediately
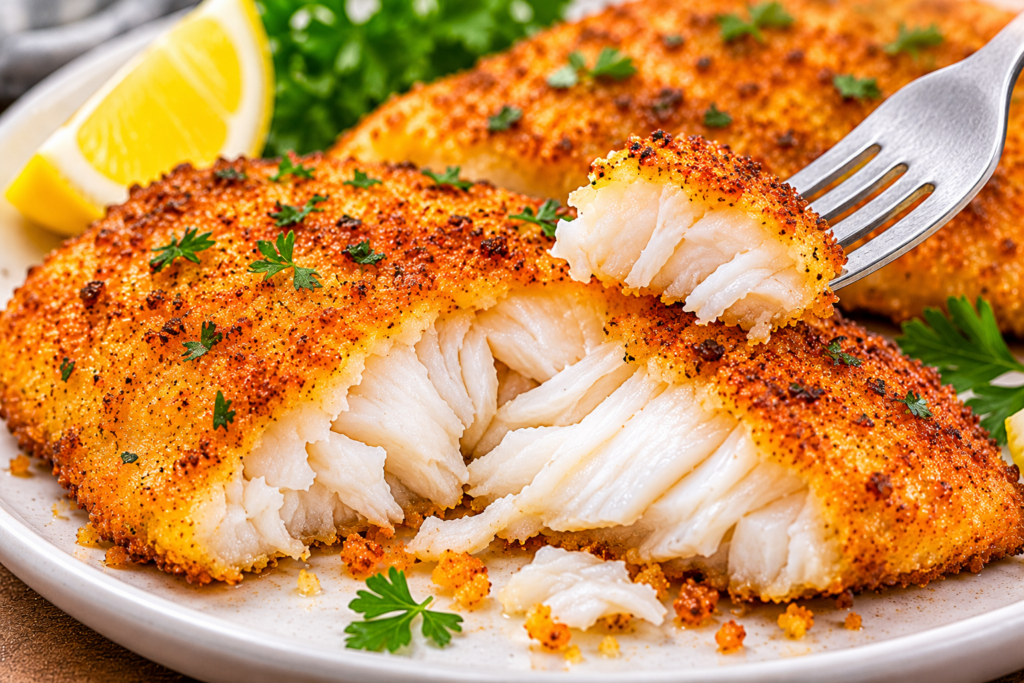
Transfer the cooked tilapia to a plate.
Let it rest briefly, then serve with fresh lemon wedges and chopped parsley.
For the best texture, enjoy it while the coating is still crisp.
A squeeze of lemon just before eating adds freshness without making the crust soggy during cooking.
🔥 7 Mistakes That Can Ruin Air Fryer Tilapia
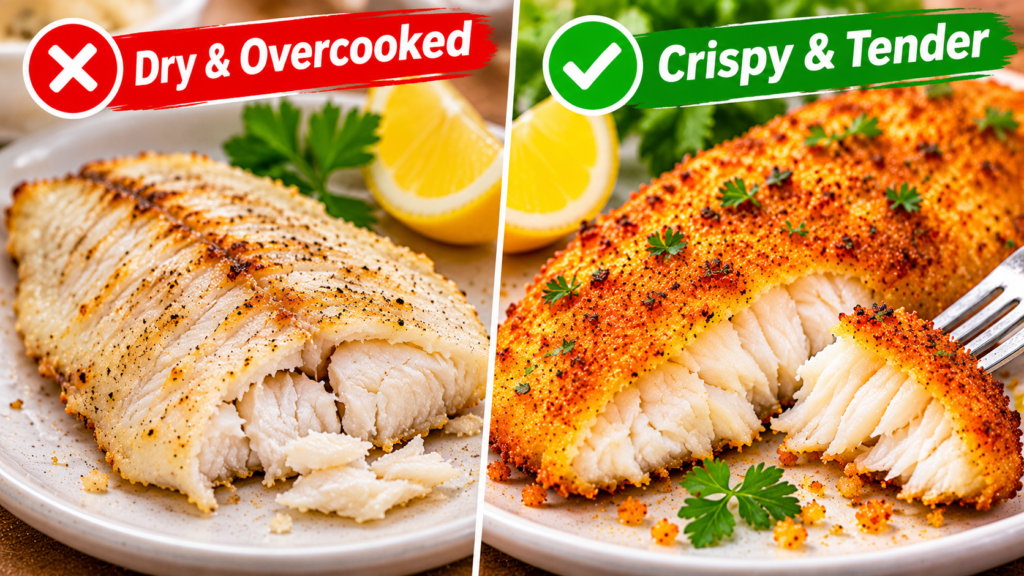
Even a simple recipe can produce disappointing results when a few details are overlooked.
1. Putting Wet Fish in the Basket
Excess moisture slows surface browning.
Better approach: Pat the fish dry before seasoning.
2. Using Too Much Oil
More oil doesn’t automatically mean more crunch.
Excess oil can weigh down a light coating.
Better approach: Use a thin, even layer.
3. Overcrowding the Basket
When fillets overlap, hot air cannot circulate properly.
Better approach: Cook in a single layer, using batches if necessary.
4. Cooking Every Fillet for the Same Amount of Time
Thin fillets cook faster than thick ones.
Better approach: Start checking early and use a food thermometer.
5. Adding Too Much Lemon Juice Before Cooking
A wet coating may soften rather than brown.
Better approach: Add lemon zest before cooking and lemon juice afterward.
6. Using a Thick Breadcrumb Coating
A heavy coating can fall off or brown unevenly.
Better approach: Apply a thin, firmly pressed layer.
7. Leaving Cooked Fish in the Air Fryer
Residual heat can continue cooking delicate fish.
Better approach: Remove the fillets once they reach the proper internal temperature.
🌿 5 Delicious Ways to Customize Your Air Fryer Tilapia
Once you master the basic recipe, try these simple variations.
1. Lemon Garlic Tilapia 🍋
Add extra garlic powder and finely grated lemon zest to the coating.
Serve with lemon wedges and fresh parsley.
This variation pairs especially well with steamed broccoli or roasted asparagus.
2. Spicy Cajun Tilapia 🌶️
Replace the Italian seasoning with a Cajun-style spice blend.
Check the salt content of packaged Cajun seasoning before adding extra salt.
Serve with rice and a refreshing yogurt-based sauce.
3. Parmesan Herb Tilapia 🧀
Increase the Parmesan slightly and add dried parsley, oregano, and basil.
This creates a savory, herb-forward coating.
4. Lightly Seasoned Tilapia Without Breadcrumbs
Skip the panko and Parmesan.
Season the dried fish with paprika, garlic powder, black pepper, salt, and a little olive oil.
Air fry until the fish reaches 145°F (63°C).
Note: This version can develop a lightly browned surface, but it won’t have the same crunchy texture as the breadcrumb-coated recipe.
5. Mediterranean-Style Tilapia 🫒
Use oregano, lemon zest, garlic, and a little olive oil.
Serve with cucumber salad, tomatoes, and a spoonful of tzatziki.
🥗 What to Serve With Crispy Air Fryer Tilapia
One reason tilapia is so convenient is its mild flavor.
It works with many side dishes, making it easy to build a complete meal.
| Side Dish | Why It Works |
|---|---|
| Roasted potatoes | A hearty, comforting pairing |
| Steamed broccoli | Simple and quick |
| Garlic rice | Complements the seasoning |
| Coleslaw | Adds freshness and crunch |
| Green salad | A lighter option |
| Roasted sweet potatoes | Adds natural sweetness |
| Cucumber yogurt sauce | Creamy contrast to the crisp coating |
Easy dinner idea: Serve one crispy tilapia fillet with roasted potatoes, a green salad, and a lemon wedge.
For a lighter meal, pair the fish with steamed vegetables and a small portion of rice.
🧊 Can You Cook Frozen Tilapia in the Air Fryer?
Yes, many air fryers can cook frozen tilapia, but the method is different.
Frozen fillets release moisture as they thaw during cooking.
That makes it harder to achieve a crisp breadcrumb coating.
For the recipe in this article, fully thawed fish is the better choice.
If cooking directly from frozen:
- Separate the frozen fillets.
- Remove any packaging.
- Follow your air fryer’s instructions for frozen fish.
- Season once the surface has thawed enough for the seasoning to adhere.
- Continue cooking until the thickest part reaches 145°F (63°C).
Cooking time will generally be longer than for thawed fish and varies considerably by thickness and appliance.
For reliable crispiness, thaw the tilapia safely in the refrigerator before using the breadcrumb coating.
🧊 How to Store and Reheat Leftover Tilapia
Leftover fish can still make a convenient lunch the following day.
Refrigerating
Allow the cooked fish to cool briefly, then refrigerate promptly in a covered, shallow container.
Do not leave cooked fish at room temperature for more than two hours, or one hour if the surrounding temperature is above 90°F (32°C).
Properly refrigerated cooked fish generally keeps for 3–4 days.
Reheating in the Air Fryer
Preheat the air fryer to approximately 350°F (175°C).
Arrange the leftover fish in a single layer.
Reheat for a few minutes, checking frequently, until the center reaches 165°F (74°C).
Avoid overheating, as tilapia can dry out quickly.
The crust may not become quite as crisp as it was when freshly cooked, but the air fryer can help restore some of its texture.
Can You Freeze Cooked Tilapia?
Yes.
Place cooled cooked fillets in a freezer-safe airtight container.
For best quality, use within approximately 2–3 months.
Thaw safely in the refrigerator before reheating.
❓ Frequently Asked Questions About Air Fryer Tilapia
How long should I cook tilapia in an air fryer at 400°F?
For fully thawed, moderately thick fillets, approximately 8–12 minutes is a useful starting range.
Actual cooking time depends on thickness, coating, basket capacity, and appliance performance.
Always confirm that the thickest part reaches 145°F (63°C).
Do I need to flip tilapia in the air fryer?
Not always.
Some air fryers brown both sides evenly without flipping.
If your model tends to brown the upper surface more quickly, carefully turn the fish partway through cooking.
How do I make tilapia crispy without flour?
You can use panko breadcrumbs, Parmesan, and a small amount of cornstarch.
The combination provides a light coating that can become golden and crisp when cooked properly.
Can I make air fryer tilapia without breadcrumbs?
Absolutely.
Use a dry seasoning blend and a thin layer of olive oil.
The fish can develop a lightly browned exterior, although it won’t have the same crunchy crust.
Why is my air fryer tilapia dry?
Tilapia is naturally lean and can dry out when overcooked.
Check the fish early, especially when using thin fillets, and remove it once the thickest part reaches 145°F (63°C).
Is air fryer tilapia healthy?
Tilapia provides protein and can be part of a balanced diet.
Air frying often requires less added oil than deep-frying.
The overall nutritional profile depends on the coating, portion size, oil, and side dishes.
Can I use another fish instead of tilapia?
Yes.
Cod, haddock, pollock, and other mild white fish can work with similar seasonings.
However, their thickness and texture vary, so adjust the cooking time and check the internal temperature.
What temperature should cooked tilapia reach?
Cook fish to an internal temperature of 145°F (63°C), measured in the thickest part with a food thermometer.
Can I prepare the coating in advance?
Yes.
Mix the dry breadcrumb and seasoning ingredients ahead of time and store them in a sealed container.
For best results, coat the fish shortly before cooking so the breadcrumbs don’t absorb too much moisture.
Discard any coating mixture that has come into contact with raw fish.
What is the best sauce for crispy air fryer tilapia?
Lemon yogurt sauce, tartar sauce, garlic aioli, or a light herb dressing all work well.
Serve sauce on the side to help preserve the crispy coating.
❤️ Final Thoughts: Crispy Fish Without the Deep Fryer
Making crispy air fryer tilapia doesn’t require a complicated technique.
The most important details are surprisingly simple: dry the fish thoroughly, apply a light coating, leave space in the basket, and avoid overcooking.
With the right preparation, you can enjoy a golden, flavorful fish dinner with a tender center and minimal cleanup.
Whether you choose classic lemon garlic, spicy Cajun seasoning, or a simple Parmesan crust, this recipe is easy to adapt to your taste.
Have you tried cooking tilapia in an air fryer? Do you prefer a crispy breadcrumb coating or a simple garlic-and-lemon version? Share your favorite combination in the comments! 🐟🍋